The difference between NPM and NPX
Master Node.js dev with NPM & NPX! NPM manages packages, while NPX executes commands easily, skipping installations. This duo streamlines workflows, boosts efficiency, and makes JavaScript development rema...
Updated

Have you ever looked at a piece of JavaScript code and thought, "Wait, why does it work like that?" Or perhaps you've stumbled upon some seemingly magical syntax and wondered how it makes life easier? If so, you're in good company! JavaScript is a language full of delightful quirks and powerful features that can sometimes feel like hidden treasures.
This article is your treasure map! We're going to dive into some of JavaScript's most fundamental yet often misunderstood concepts. Whether you're just starting your coding adventure or looking to solidify your intermediate skills, we'll break down these topics with simple explanations, relatable analogies, and clear code examples.
Ready to unlock some JavaScript superpowers? Let's go!

Imagine you're at a big construction site. Before anyone starts laying bricks or painting walls, the architects and engineers gather all the blueprints and plans. They organize everything at the very top, deciding where each major component will go.
JavaScript's interpreter does something similar, and it's called Hoisting. Before your code even begins to execute line by line, the interpreter "hoists" (or conceptually moves) the declarations of variables, functions, and classes to the very top of their respective scopes.
This often surprises developers, leading to unexpected outputs. Let's see it in action:
console.log(myFavoriteColor); // What do you think this will print?
var myFavoriteColor = "blue";
console.log(myFavoriteColor); // This will print "blue"
If you guessed undefined for the first console.log, you're spot on! Here's why:
// What the interpreter 'sees' after hoisting 'myFavoriteColor'
var myFavoriteColor // Declaration is hoisted to the top
console.log(myFavoriteColor) // myFavoriteColor exists, but hasn't been assigned a value yet, so it's 'undefined'
myFavoriteColor = 'blue'
console.log(myFavoriteColor) // Now it's 'blue'
Key Takeaway: Only the declaration is hoisted, not the initialization (the value assignment).
A Note on let and const: Hoisting behaves differently with let and const. While they are technically hoisted to the top of their scope, they enter a "Temporal Dead Zone" (TDZ) until their actual declaration is reached. This means you cannot access them before they are declared, preventing the undefined behavior seen with var. This is generally considered a safer and less confusing behavior.
// console.log(myAge); // This would throw a ReferenceError, as 'myAge' is in the TDZ
let myAge = 30
console.log(myAge) // 30
Functions Get Hoisted Too! Functions declared using the function keyword are also fully hoisted. This means you can call them before they appear in your code:
sayHello(); // No problem here!
function sayHello() {
  console.log("Hello there!");
}
However, if you define a function as an expression (assigning it to a var, let, or const variable), only the variable declaration is hoisted, not the function definition itself.
// greetExpression(); // This would cause an error because greetExpression is 'undefined' or in TDZ
var greetExpression = function() {
  console.log("Good morning from an expression!");
};
greetExpression(); // This works
Understanding hoisting helps you predict JavaScript's behavior and write more robust code.

Imagine you have a highly sensitive mission, and you need a special agent to perform a task immediately and then disappear, leaving no trace of their internal workings. In JavaScript, that's an Immediately Invoked Function Expression (IIFE).
An IIFE is a function that runs as soon as it's defined. It's like writing a function and then, without delay, adding () right after it to call it.
// A regular function needs to be called explicitly:
function greetRegularly() {
  console.log("Hello from a regular function!");
}
greetRegularly(); // We have to call it

// An IIFE: It runs as soon as it's defined!
(function() {
  console.log("Hello from an IIFE! I run instantly!");
})();
Why use IIFE's?
IIFEs were incredibly popular before ES6 modules (`import`/`export`) provided better native ways for modularity and scope management. However, understanding them is still crucial for reading older codebases and appreciating JavaScript's evolution.
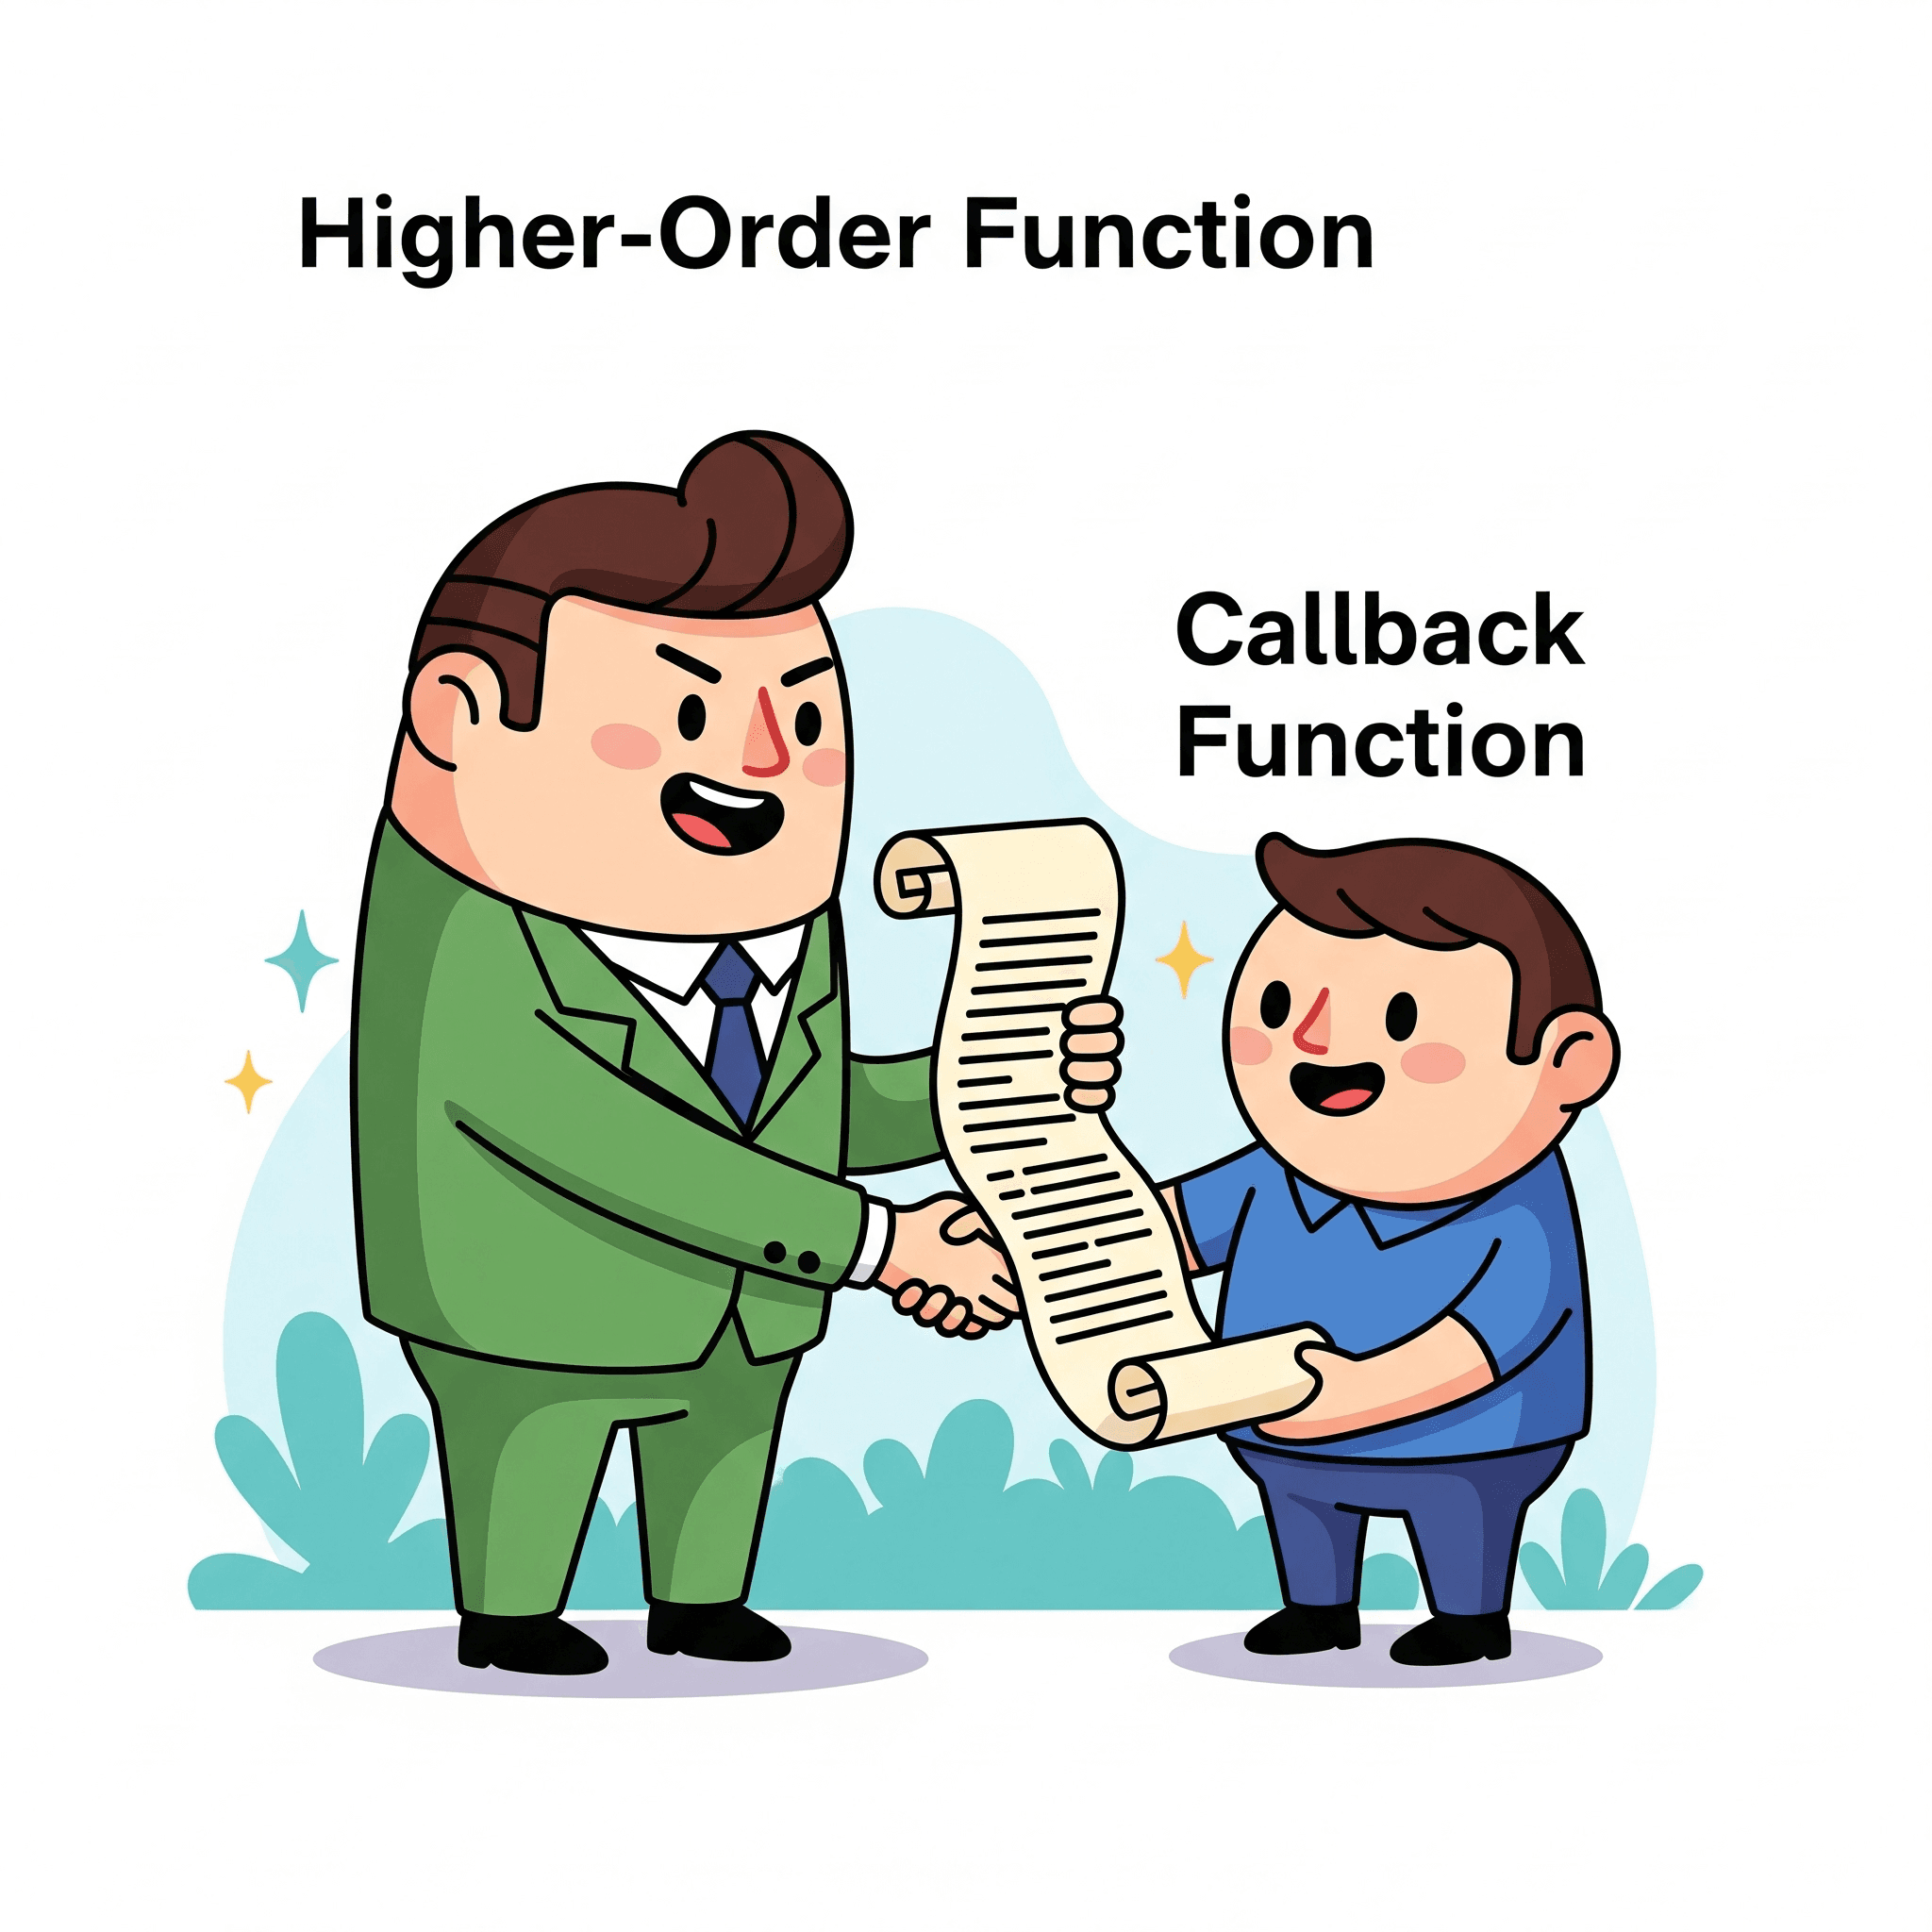
Think of a Higher-Order Function (HOF) as a manager, and a Callback Function as a specialist. The manager (HOF) needs to get a job done, but instead of doing it all themselves, they delegate a specific part of the task to a specialist (callback). The manager says, "Here, you do this part, and call me back when you're done!"
Let's illustrate with a simple calculator example. Instead of having separate functions for add, subtract, etc., and then hardcoding their calls, we can use HOFs and callbacks:
// Our "specialist" functions (callbacks)
const add = (a, b) => {
  return a + b;
};

const subtract = (a, b) => {
  return a - b;
};

const multiply = (a, b) => {
  return a * b;
};

// Our "manager" function (Higher-Order Function)
const calculator = (num1, num2, operationCallback) => {
  console.log(`Performing operation with ${num1} and ${num2}...`);
  return operationCallback(num1, num2); // It calls the 'specialist'
};

// --- Using the dynamic duo ---
console.log("Addition:", calculator(10, 5, add));      // 'add' is the callback
console.log("Subtraction:", calculator(10, 5, subtract)); // 'subtract' is the callback
console.log("Multiplication:", calculator(10, 5, multiply)); // 'multiply' is the callback

// You can even pass an anonymous function as a callback!
console.log("Division:", calculator(10, 5, (a, b) => a / b));
In this example, calculator is the Higher-Order Function because it accepts `operationCallback` (which is itself a function) as an argument. The add, subtract, and multiply functions are Callback Functions because they are passed into calculator to be executed when calculator decides.
This pattern makes your code much more flexible and reusable, as calculator can now handle any operation, as long as you provide the right callback.

As powerful as callbacks are, using too many of them, especially for sequential asynchronous operations, can lead to a dreaded scenario known as Callback Hell, or the "Pyramid of Doom."
Imagine you're trying to perform a series of steps:
Each step depends on the previous one, forcing you to nest callbacks deeper and deeper. The code becomes increasingly indented, hard to read, and a nightmare to maintain or debug.
console.log("Starting a complex sequence...");

setTimeout(() => { // Step 1: Get user data (simulated delay)
  console.log('1️⃣ User data fetched.');
  setTimeout(() => { // Step 2: Get user posts
    console.log('2️⃣ User posts fetched.');
    setTimeout(() => { // Step 3: Get comments for first post
      console.log('3️⃣ Comments fetched.');
      setTimeout(() => { // Step 4: Process comments
        console.log('4️⃣ Comments processed.');
        // ... and it could go on and on...
        setTimeout(() => {
          console.log('5️⃣ Final step complete!');
        }, 500);
      }, 500);
    }, 500);
  }, 500);
}, 500);
As you can see, the code forms a triangular shape, making it very difficult to follow the flow. This is where the next powerful concept comes to the rescue!

To escape the "Callback Hell," JavaScript introduced Promises. Think of a Promise as a placeholder for a value that is not yet known. It's like placing an order online:
A Promise can be in one of three states:
Here's how we create and use a Promise:
// --- Creating a Promise (the "producing code") ---
let myOrderPromise = new Promise(function(resolve, reject) {
  // Simulate an asynchronous operation (e.g., fetching data from a server)
  let orderSuccessful = Math.random() > 0.5; // 50% chance of success

  setTimeout(() => {
    if (orderSuccessful) {
      resolve('Your order #12345 has been delivered successfully!'); // Success!
    } else {
      reject('Sorry, your order #12345 was cancelled due to an issue.'); // Failure!
    }
  }, 2000); // Simulate a 2-second delay
});

// --- Consuming the Promise (reacting to its outcome) ---

// What happens when the promise is fulfilled
myOrderPromise.then(function successValue(message) {
  console.log("Success! 🎉", message);
})
// What happens when the promise is rejected
.catch(function errorValue(error) {
  console.error("Oops! 😔", error);
})
// What happens regardless of success or failure
.finally(() => {
  console.log("Order processing complete.");
});

console.log("Order placed! Waiting for delivery..."); // This logs immediately because the promise is asynchronous
Promises offer a much cleaner way to chain asynchronous operations, moving away from nested callbacks to a more readable linear flow using `.then()`.

While Promises were a huge leap forward, JavaScript ES2017 introduced async and await, making asynchronous code look and feel almost like synchronous code – but without blocking the main thread! It's the ultimate tool for handling Promises gracefully.
Let's revisit our "order delivery" scenario with `async/await`:
// A function that returns a Promise (like our order delivery)
function simulateDelivery(orderId) {
  return new Promise((resolve, reject) => {
    let orderSuccess = Math.random() > 0.5; // Still 50% chance of success

    setTimeout(() => {
      if (orderSuccess) {
        resolve(`Order #${orderId} delivered!`);
      } else {
        reject(`Order #${orderId} failed.`);
      }
    }, 2000); // Still a 2-second delay
  });
}

// Our asynchronous function using async/await
async function processOrder(orderNumber) {
  console.log(`Processing order #${orderNumber}...`);
  try {
    // Await pauses execution here until simulateDelivery resolves or rejects
    let deliveryStatus = await simulateDelivery(orderNumber);
    console.log("📦 Delivery Update:", deliveryStatus);
    console.log(`Order #${orderNumber} journey complete.`);
  } catch (error) {
    // If simulateDelivery rejects, the error is caught here
    console.error("❌ Delivery Error:", error);
  } finally {
    console.log(`--- End of processing for order #${orderNumber} ---`);
  }
}

// Call the async function
processOrder(101);
processOrder(102); // This will run almost simultaneously with 101, thanks to async nature
Notice how await `simulateDelivery(orderNumber)` makes the asynchronous operation look like a simple, sequential line of code. The `try...catch` block handles errors just like synchronous code, making error management much more intuitive than chaining .catch() for every promise.
`async` and `await` are game-changers for writing clean, readable, and maintainable asynchronous JavaScript code.

Imagine a secret agent (our inner function) who, no matter where they go, always carries a little box with them. Inside this box are special tools and notes (variables) from their original training ground (the outer function's scope). Even after the training ground is gone, the agent still has access to those tools.
That's a Closure! A closure is when an inner function "remembers" and can access variables from its outer (enclosing) function's scope, even after the outer function has finished executing.
function createCounter() {
  let count = 0; // This 'count' variable is part of the outer function's scope

  // The inner function that will become the closure
  const increment = () => {
    count++; // It 'closes over' and remembers 'count'
    console.log(`Counter: ${count}`);
  };

  return increment; // We return the inner function
}

// 'counter1' is now a closure. It carries its own 'count' variable.
const counter1 = createCounter();
counter1(); // Output: Counter: 1
counter1(); // Output: Counter: 2

// 'counter2' is a completely separate closure, with its own 'count'.
const counter2 = createCounter();
counter2(); // Output: Counter: 1
In this example, when `createCounter()` is called, it creates a count variable and an increment function. Even after `createCounter()` finishes and count would normally be "gone," the increment function (which we assigned to `counter1` and `counter2`) still has access to its own count variable. Each call to `createCounter()` creates a new count variable and a new increment function that's "closed over" that specific count.
Closures are fundamental for concepts like data privacy, creating private variables in JavaScript, and implementing patterns like function factories or memoization.
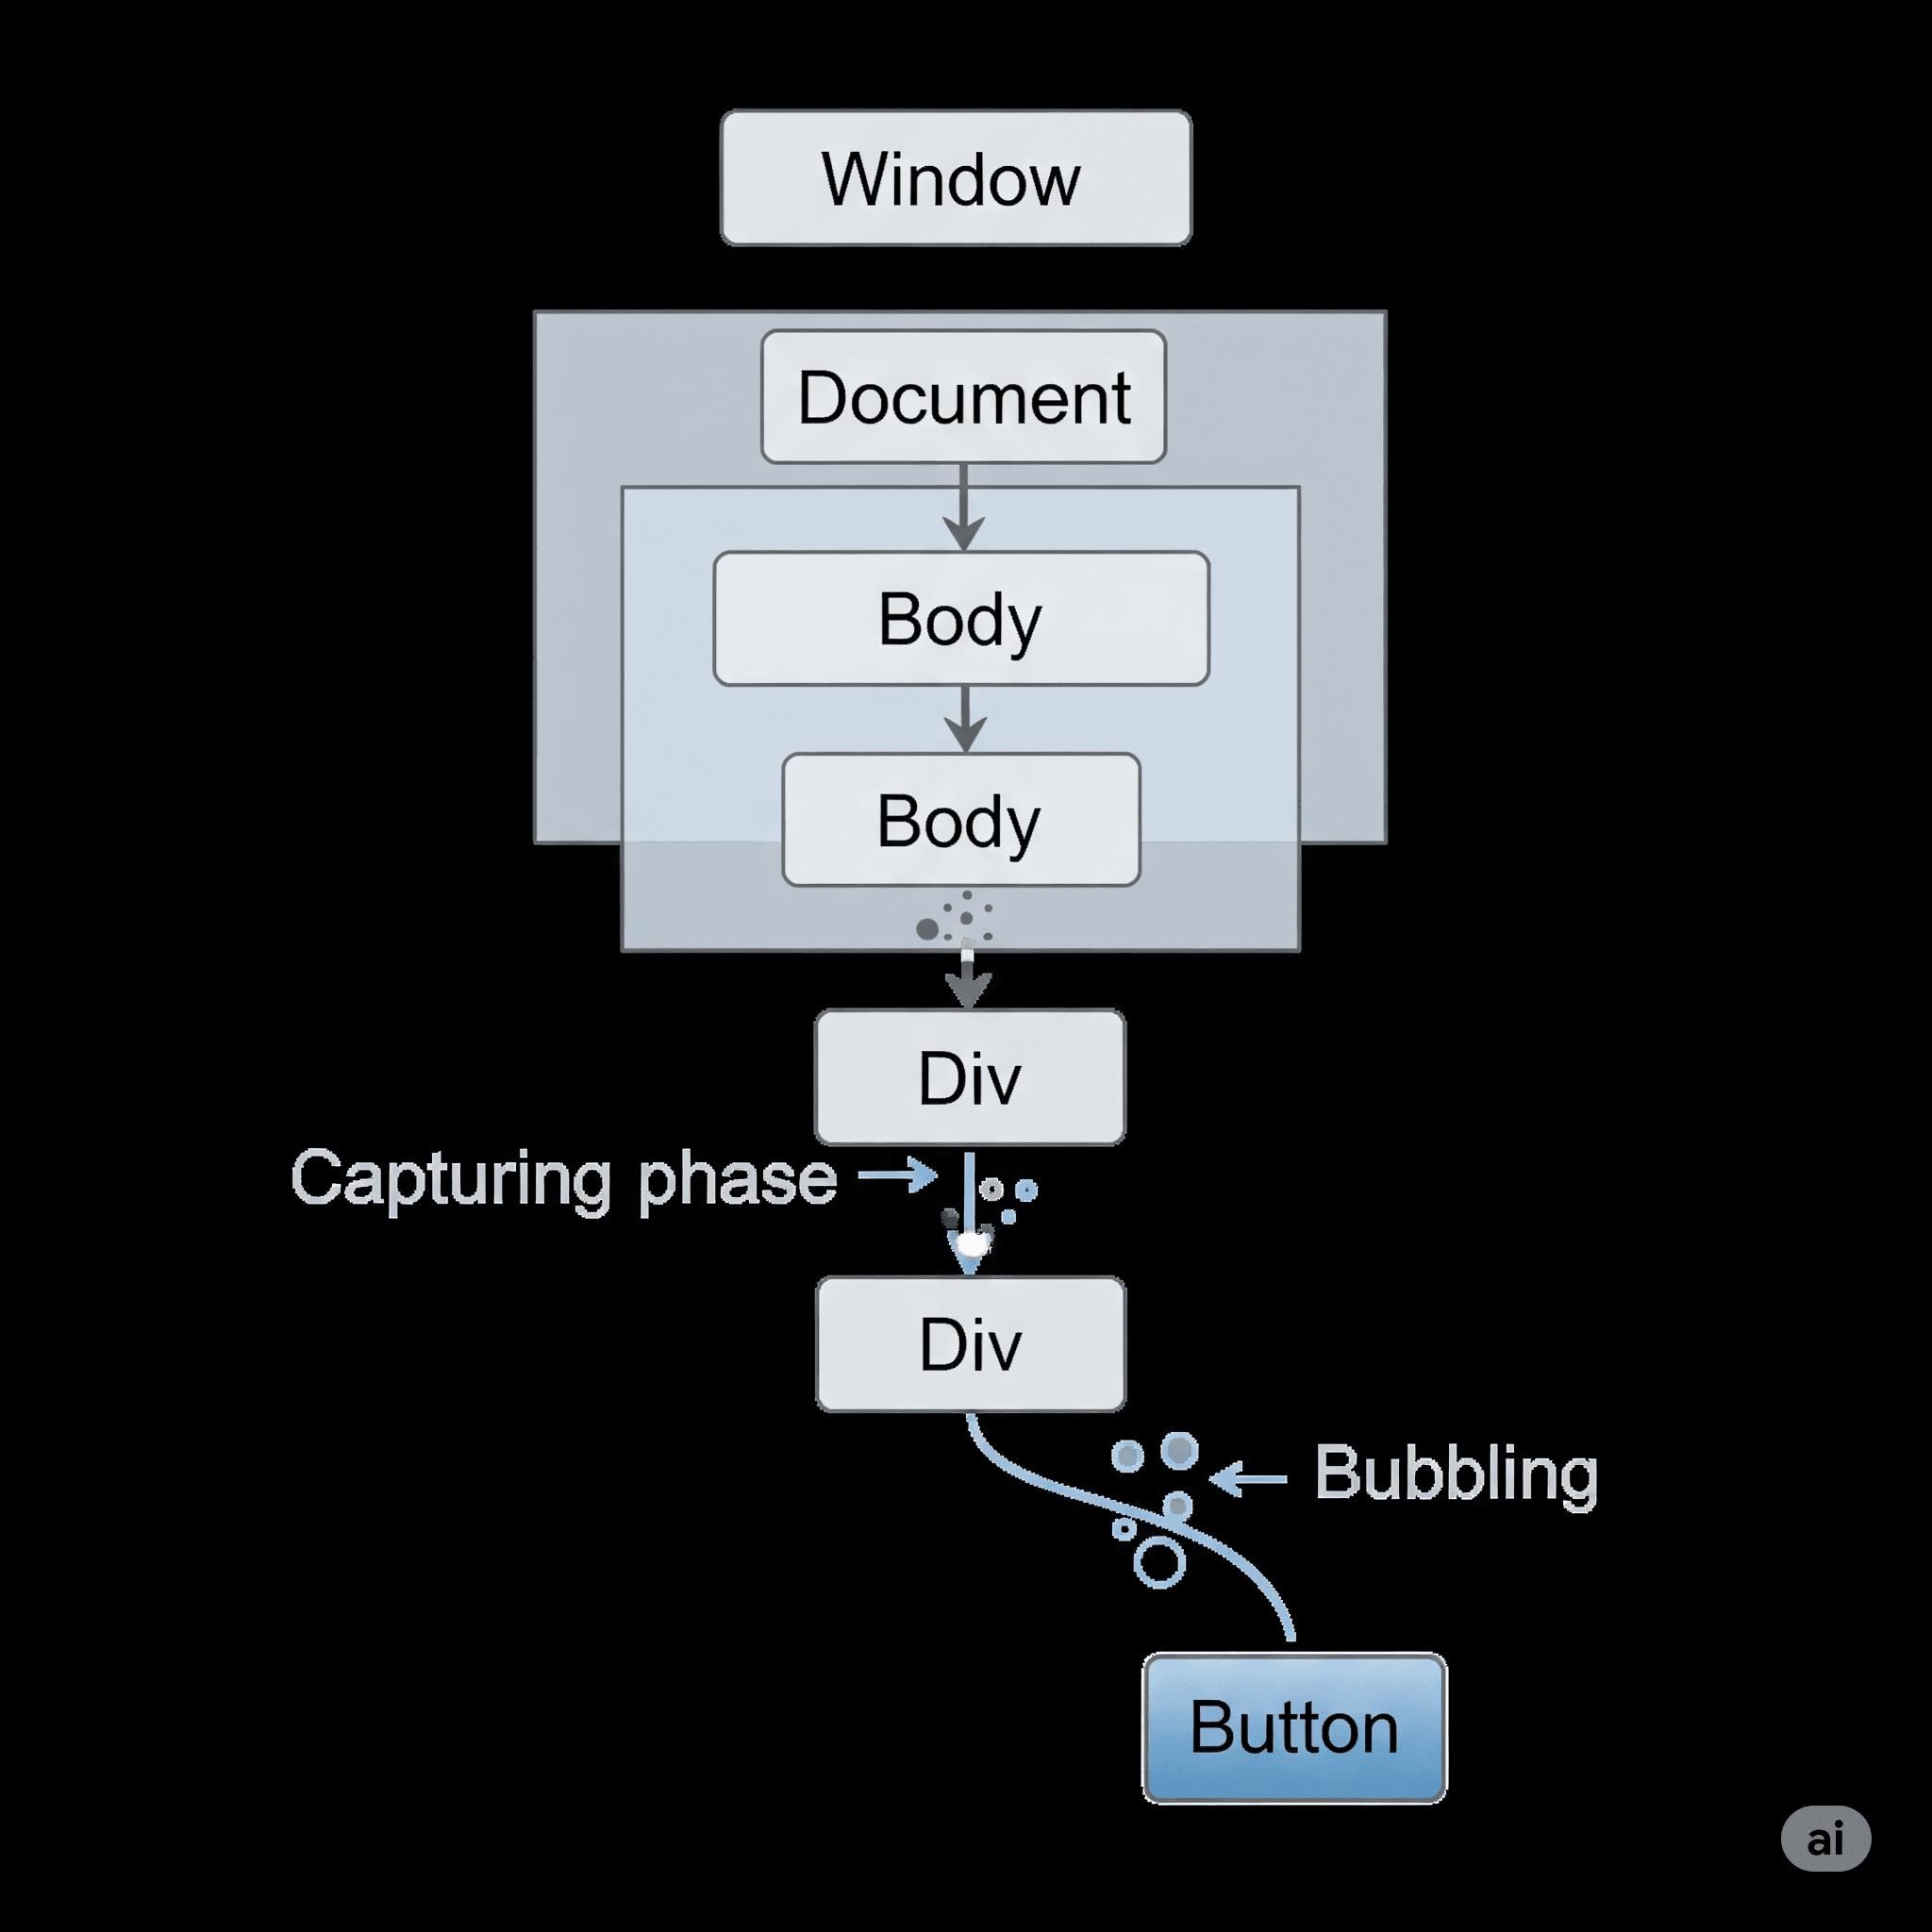
When you click on a button on a webpage, it's not just the button that "hears" the click. That click is like a pebble dropped in a pond, creating ripples that travel across the entire web page's structure, known as the DOM (Document Object Model) tree. This journey is called Event Propagation.
Event propagation happens in two main phases in modern browsers:
Capturing Phase (Trickle Down):
Bubbling Phase (Bubble Up):
By default, most event handlers in JavaScript trigger during the bubbling phase. This is often what you want, as it allows you to handle events on parent elements that might contain many child elements (a technique called "event delegation").
However, understanding both phases is key for advanced event handling, especially when dealing with scenarios like stopping an event from reaching its ancestors (`event.stopPropagation()`) or handling events at an earlier, capturing stage.

Currying is a functional programming technique where you take a function that accepts multiple arguments and transform it into a series of functions, each accepting only one argument. It's like ordering a complex coffee drink: instead of telling the barista everything at once, you give them one instruction at a time: "add espresso," then "add milk," then "add foam."
// A regular function that takes 3 arguments
const sumRegular = (a, b, c) => {
  return a + b + c;
};
console.log("Regular sum:", sumRegular(2, 3, 5)); // Output: 10

// The curried version of a sum function
const sumCurried = (num1) => {
  return (num2) => {
    return (num3) => {
      return num1 + num2 + num3;
    };
  };
};

// Calling the curried function
console.log("Curried sum (step-by-step):", sumCurried(2)(3)(5)); // Output: 10

// You can also create specialized functions:
const addFive = sumCurried(5);      // Returns a new function (num2) => (num3) => 5 + num2 + num3
const addFiveAndThree = addFive(3); // Returns a new function (num3) => 5 + 3 + num3
console.log("Specialized sum:", addFiveAndThree(8)); // Output: 16 (5 + 3 + 8)
Why use Currying?
Currying is a powerful concept in functional programming that allows for greater flexibility and reusability of functions.

The Spread Operator (...) in JavaScript (introduced in ES6) is like a magical tool that can "unwrap" or "expand" iterable elements (like arrays, strings, or objects) into individual elements. It allows you to quickly make copies, combine collections, and pass arguments.
1. Expanding Arrays:
const colors = ['red', 'green', 'blue'];
const moreColors = ['yellow', 'pink'];

// Combining arrays easily:
const allColors = [...colors, ...moreColors, 'black'];
console.log("All colors:", allColors); // Output: ['red', 'green', 'blue', 'yellow', 'pink', 'black']

// Copying an array (shallow copy):
const colorsCopy = [...colors];
console.log("Colors copy:", colorsCopy); // Output: ['red', 'green', 'blue']
2. Expanding Objects (for properties):
const userProfile = {
  name: 'Alice',
  age: 30
};
const userDetails = {
  city: 'New York',
  occupation: 'Engineer'
};

// Combining objects easily:
const fullUser = { ...userProfile, ...userDetails, isAdmin: true };
console.log("Full user profile:", fullUser);
// Output: { name: 'Alice', age: 30, city: 'New York', occupation: 'Engineer', isAdmin: true }

// Copying an object (shallow copy):
const profileCopy = { ...userProfile };
console.log("Profile copy:", profileCopy); // Output: { name: 'Alice', age: 30 }
3. Passing arguments to functions:
function sum(a, b, c) {
  return a + b + c;
}

const numbers = [1, 2, 3];
console.log("Sum of numbers:", sum(...numbers)); // Output: 6
The spread operator is incredibly versatile and makes working with data structures much more concise and readable.

If the Spread Operator is about expanding data, then Destructuring Assignment is about unpacking data. It's a JavaScript expression that allows you to extract values from arrays or properties from objects into distinct variables in a very concise way. It's like having a specially designed box opener that automatically sorts its contents for you!
1. Array Destructuring:
const studentInfo = ['John Doe', 'Computer Science', 22];

// Traditional way to assign variables
// const name = studentInfo[0];
// const major = studentInfo[1];
// const age = studentInfo[2];

// Using Array Destructuring (much cleaner!):
const [name, major, age] = studentInfo;

console.log("Name:", name);   // Output: John Doe
console.log("Major:", major); // Output: Computer Science
console.log("Age:", age);     // Output: 22

// You can skip elements, use default values, and use the rest operator
const [firstName, , , ...otherDetails] = ['Alice', 'Smith', 25, 'Student', 'New York'];
console.log("First Name:", firstName);   // Output: Alice
console.log("Other Details:", otherDetails); // Output: ['Student', 'New York']
2. Object Destructuring:
const book = {
  title: 'The Great JavaScript Adventure',
  author: 'Code Master',
  pages: 500,
  publishedYear: 2023
};

// Traditional way to assign variables
// const bookTitle = book.title;
// const bookAuthor = book.author;

// Using Object Destructuring:
const { title, author, pages } = book;

console.log("Book Title:", title);     // Output: The Great JavaScript Adventure
console.log("Author:", author);         // Output: Code Master
console.log("Pages:", pages);           // Output: 500

// You can rename properties, set default values, and extract nested properties:
const {
  title: bookName, // Rename 'title' to 'bookName'
  publisher = 'Self-Published', // Default value if 'publisher' doesn't exist
  author: {
    firstName: authorFirstName = "N/A"
  } // Destructuring a nested object (assuming author was an object)
} = book;

console.log("Book Name:", bookName);
console.log("Publisher:", publisher);
// console.log("Author First Name:", authorFirstName); // This would error unless 'author' was a nested object
Destructuring is incredibly powerful for cleaning up your code, especially when dealing with function arguments or extracting specific pieces of data from complex objects returned by APIs.
You've just explored some of the most essential and often mind-bending concepts in JavaScript! From understanding how code is processed with Hoisting, to keeping secrets safe with IIFEs and Closures, to mastering the art of asynchronous programming with Callbacks, Promises, and Async/Await, and finally, making your data handling a breeze with Spread and Destructuring – you've covered a lot of ground!
These concepts aren't just theoretical; they are the building blocks of modern, robust, and maintainable JavaScript applications. Keep practicing, keep building, and keep exploring! The world of JavaScript is vast and exciting, and you're now better equipped to navigate it. Happy coding!
Master Node.js dev with NPM & NPX! NPM manages packages, while NPX executes commands easily, skipping installations. This duo streamlines workflows, boosts efficiency, and makes JavaScript development rema...
Unlock better code! The 4 core OOP principles – abstraction, inheritance, encapsulation, & polymorphism – empower you to write more testable, flexible, & maintainable software. Master them for robust devel...